How to find a specific satellite image in Google Earth Engine

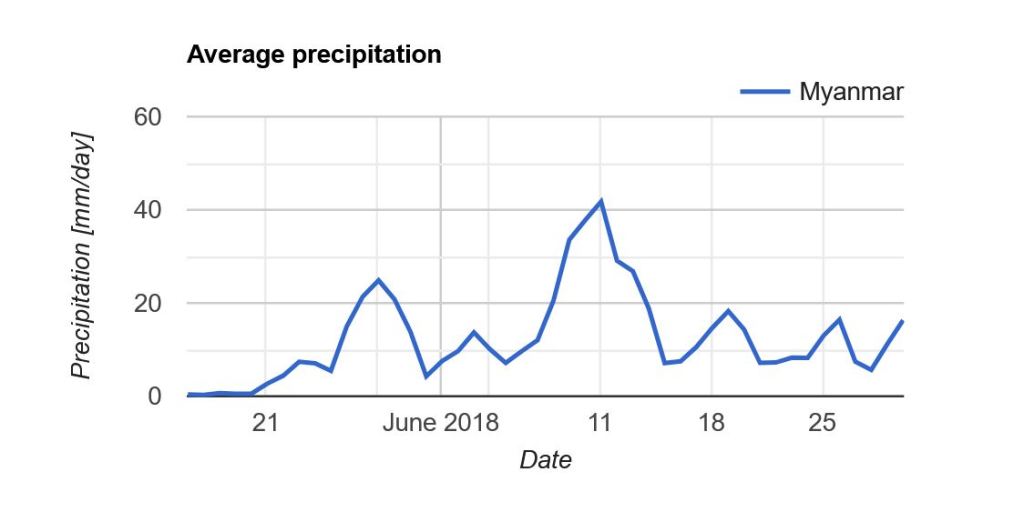
Let’s say there is a specific spatial event that you are interested in, for example the volcanic eruption in Tonga on January 15th in 2022.

For this example I will use data from publicly available polar orbiting satellites. These kind of satellites only take a single image of an area, and returns to that area perhaps a week later. So it is pretty unlikely that one of these satellites passed by at the exact time of the eruption, but I hope to find some before-and-after shots.

Now, you might have seen incredible images of events like the Tonga eruption. Here is a gif of the Japanese meteorological satellite Himawari 8:

From the Japanese National Institute of Informatics (link)

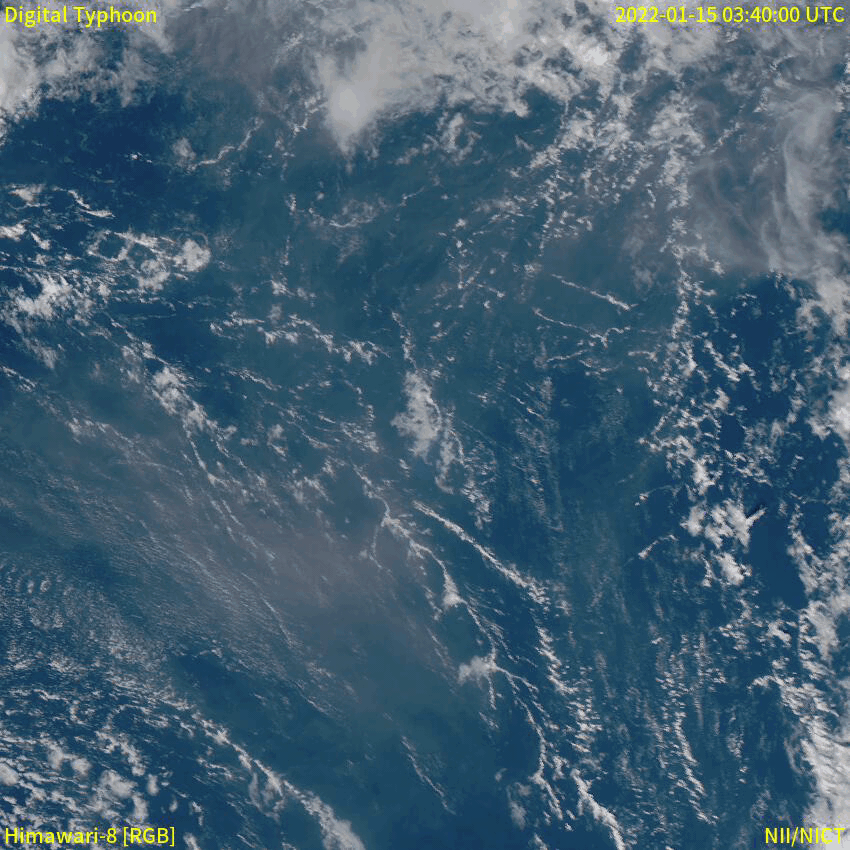
Meteorological satellites are geostationary, which means that they follow the rotation of the earth and therefore appear as if they are in a fixed position in the sky. Geostationary satellites are typically placed at an altitude of 35,800 kilometers, compared to only 500-600 kilometers of polar orbiting satellites. A satellite like the Himawari 8 can obtain images e.g. every 10 minutes, which is not what we will be dealing with now (sorry to disappoint).

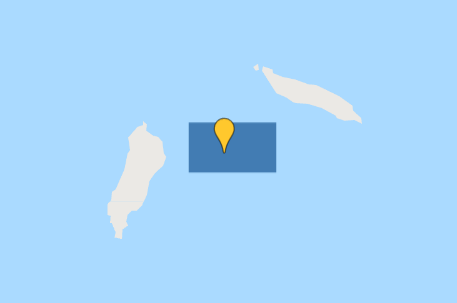
The first thing to do in Google Earth Engine is to get the location of the event. In this case, it is the Hunga Tonga–Hunga Ha’apai volcano in the southern Pacific Ocean.

I create a geometry point at approximately (-175.39, -20.55), which roughly corresponds to where the volcano is located. I also create a polygon, which I will use to search for satellite images that overlap the area.

Point and polygon are in place

Now let’s hunt for satellite images!

The two Earth Observation satellite programmes that I am most familiar with are Landsat and Sentinel, so let’s focus on those.

I want to start by getting an idea of what the volcano looked like before the eruption. Let’s get a nice, cloud-free image from both satellite programmes.

Since Landsat 9 was launched in September 2021, I will use data from Landsat 8 instead for this pre-eruption image. I will set the cloud cover to a maximum of 20% to keep the image as clear as possible:

var l8_2021 = ee.ImageCollection('LANDSAT/LC08/C02/T1_TOA')
                  .filterDate('2021-01-01', '2022-01-01')
                  .filterBounds(geometry)
                  .filter(ee.Filter.lt('CLOUD_COVER_LAND', 20));
var l8_2021 = l8_2021.select(['B2','B3','B4'], ['B2','B3','B4'])
print(l8_2021, 'Landsat 8 (2021 average)');

var visualisation_l8 = {
  bands: ['B4', 'B3', 'B2'],
  min: 0.01,
  max: 0.2,
};

Map.addLayer(l8_2021.mean(), visualisation_l8, 'Landsat 8 2021')

Let’s do the same for Sentinel 2:

var s2_2021 = ee.ImageCollection('COPERNICUS/S2')
                  .filterDate('2021-01-01', '2022-01-01')
                  .filterBounds(geometry)
                  .filter(ee.Filter.lt('CLOUDY_PIXEL_PERCENTAGE', 5));

var s2_2021 = s2_2021.select(['B2','B3','B4'], ['B2','B3','B4'])
print(s2_2021, 'Sentinel 2 (2021 average)');

var visualisation_s2 = {
  min: 600,
  max: 2000,
  bands: ['B4', 'B3', 'B2'],
};

Map.addLayer(s2_2021.mean(), visualisation_s2, 'Sentinel 2 2021');

Note that I set the cloud cover to only 5% for the Sentinel 2 images. I allow myself to set it that low, because there are much more images available than in the Landsat collection.

Here are the resulting images:

The Landsat 8 (left) is comprised of the average of 3 images,
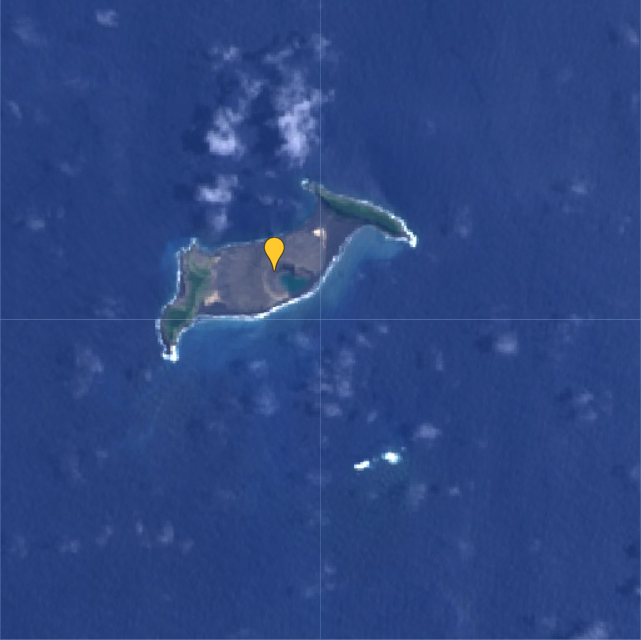
whereas the Sentinel 2 (right) is based on the average of 20 images.

From this comparison I think it is quite clear that the Sentinel 2 images have a higher spatial resolution than the Landsat 9 images.

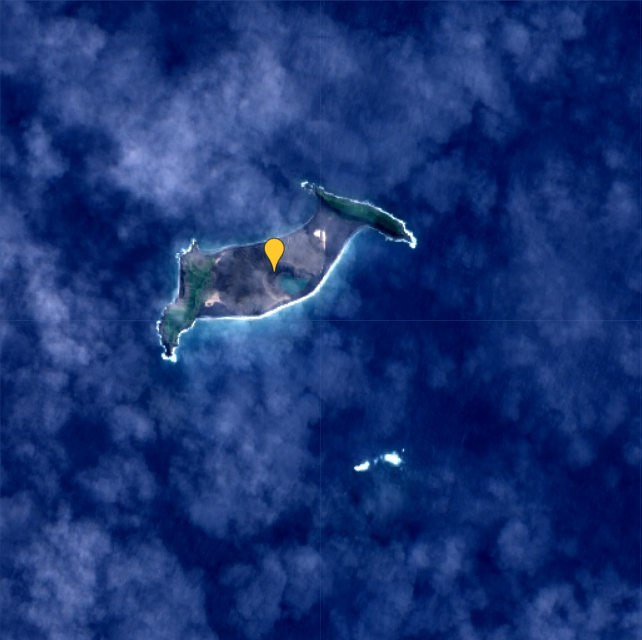
Now we know the situation before the eruption. Next we need to find out if there was a satellite passing over the volcano on the day of the eruption, or at least closely after. First, let’s have a look at the newly launched Landsat 9:

var l9 = ee.ImageCollection('LANDSAT/LC09/C02/T1_TOA')
                  .filterDate('2022-01-15', '2022-01-20')
                  .filterBounds(geometry);
var l9 = l9.select(['B2','B3','B4'], ['B2','B3','B4'])
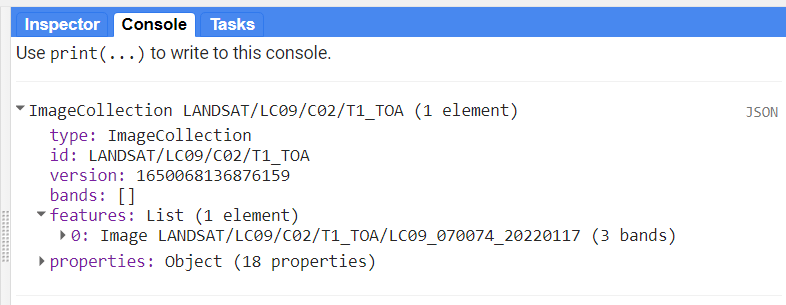
print(l9, 'Landsat 9 (eruption)');

From the print-statement I can see that there is a single image from Landsat 9 available, from January 17th:

Let’s do the same for Sentinel 2:

var s2 = ee.ImageCollection('COPERNICUS/S2')
                  .filterDate('2022-01-15', '2022-01-20')
                  .filterBounds(geometry);

var s2 = s2.select(['B2','B3','B4'], ['B2','B3','B4'])
print(s2, 'Sentinel 2 (eruption)');

Here I also only get a single image, also from January 17th:

Luckily, both images are fairly cloud free, so we are able to see what remains of the island after the volcanic eruption two days prior:

Landsat 9 (left) and Sentinel 2 (right) on January 17 2022, two days after the eruption.

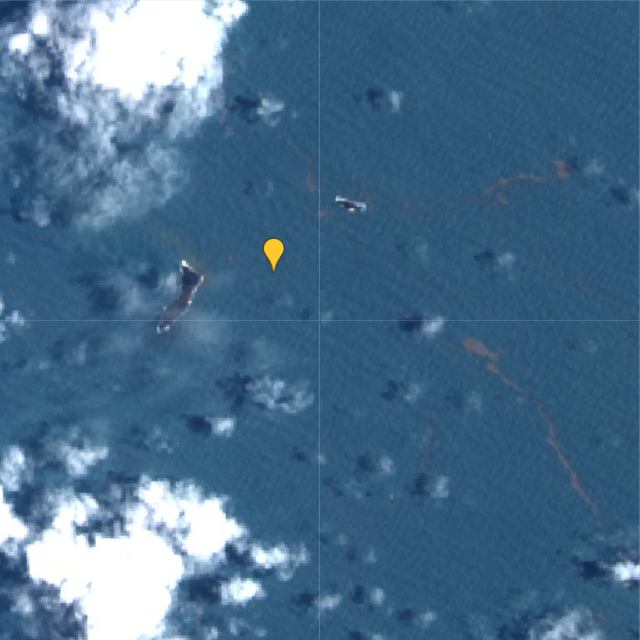
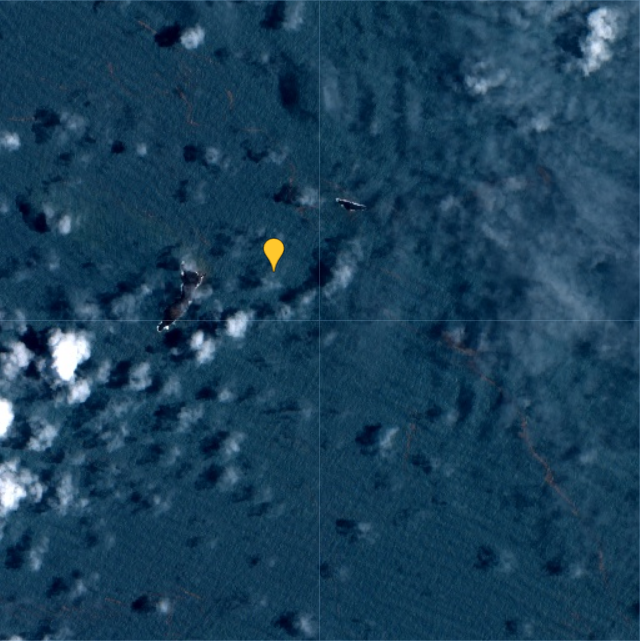
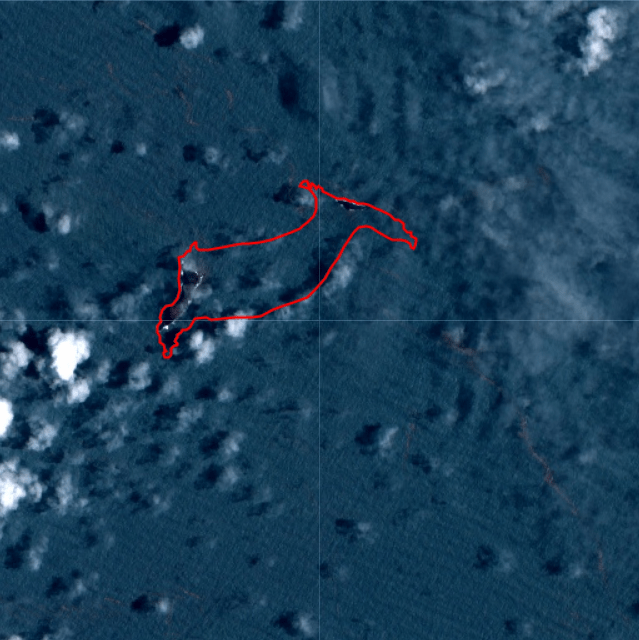
When comparing one of the images from January 17th to the average from 2021, it becomes evident that almost the entire island has disappeared as a result of the eruption:

I drew a polygon to make the difference more clear in the post-eruption image:

According to an estimate by NASA’s Earth Observatory, the eruption of Hunga Tonga–Hunga Ha’apai “released hundreds of times the equivalent mechanical energy of the Hiroshima nuclear explosion”. The plume from the eruption rose to 58 kilometers, making it the largest known volcanic plume measured by satellites.

You can find the Google Earth Engine code here.

Time series for SSM, ET and precipitation for Myanmar [Google Earth Engine]

Back in December 2018, I was in Yangon (Myanmar) to help facilitate a workshop on satellite-based remote sensing to support water professionals in the country. For this workshop, I created a script to calculate a time series for surface soil moisture, evapotranspiration and precipitation.

The data for this script are:

The first thing to do is to load the shapefile of Myanmar, using the LSIB dataset. We need to deal with the auto generated system:index, which otherwise causes some visualisation issues later on. The auto generated ID for the Feature could be something like 000000000000000092.

My solution is a bit of a ‘hack’, because in this specific case, I only have a single Feature in my FeatureCollection, i.e. the shapefile of Myanmar. That means that I can use .first() and .set() to change the system:index of the single Feature. In this instance, I change the system:index to Myanmar.

// Select country from list
var countries = ee.FeatureCollection("USDOS/LSIB/2017");
var fc = countries.filter(ee.Filter.inList('COUNTRY_NA',['Burma']));
print('Old system:index', fc);

// Change system:index from the auto generated name
var feature = ee.Feature(fc.first().set('system:index', 'Myanmar')); // .first() is used as there is just one Feature
var Myanmar = ee.FeatureCollection(feature);
print('New system:index', Myanmar);

// Add Myanmar and center map
Map.centerObject(Myanmar);
Map.addLayer(Myanmar, {}, 'Myanmar shapefile');

This gives the following output:

Now I load the imageCollections of the three datasets.

// Filter datasets for bands and period
var SSM = ee.ImageCollection('NASA_USDA/HSL/SMAP_soil_moisture')
      .select('ssm')
      .filterBounds(Myanmar)
      .filterDate(startdate, enddate);

var ET = ee.ImageCollection('MODIS/006/MOD16A2')
      .select('ET')
      .filterBounds(Myanmar)
      .filterDate(startdate, enddate);
      
var PRCP = ee.ImageCollection('UCSB-CHG/CHIRPS/DAILY')
      .select('precipitation')
      .filterBounds(Myanmar)
      .filterDate(startdate, enddate);

Next, I create a single image consisting of the mean of each imageCollection for the given time period. This is purely for visualisation purposes as you will see next.

// Calculate means for visualisation
var SSM_mean = SSM.mean()
  .clip(Myanmar);

var ET_mean = ET.mean()
  .clip(Myanmar);

var PRCP_mean = PRCP.mean()
  .clip(Myanmar);

I set the visualisation parameters, and add the data to my map.

// Set visualisation parameters    
var soilMoistureVis = {
  min: 10.0,
  max: 28.0,
  palette: ['0300ff', '418504', 'efff07', 'efff07', 'ff0303'],
};

var evapotranspirationVis = {
  min: 0.0,
  max: 300.0,
  palette: [
    'ffffff', 'fcd163', '99b718', '66a000', '3e8601', '207401', '056201',
    '004c00', '011301'
  ],
};

var precipitationVis = {
  min: 1.0,
  max: 30.0,
  palette: ['#ffffcc','#a1dab4','#41b6c4','#2c7fb8','#253494'],
};

// Visualize maps
Map.addLayer(SSM_mean, soilMoistureVis, 'SSM');
Map.addLayer(ET_mean, evapotranspirationVis, 'ET');
Map.addLayer(PRCP_mean, precipitationVis, 'PRCP');

That gives us the following output:


Now what we really want is a graph showing the development of the data through time. Due to the limited memory capacity of Google Earth Engine, I can’t get more than 1.5 month of data, but that is enough to have a look at the onset of the monsoon season in May/June.

I use the ui.Chart.image.seriesByRegion where the arguments are: imageCollection, regions, reducer, band, scale, xProperty, seriesProperty (last four are optional). In addition, I use .setOptions() to add a main title and axis titles.

// Define graphs
var SSMGraph = ui.Chart.image.seriesByRegion({
  imageCollection: SSM, 
  regions: Myanmar, 
  band: 'ssm',
  reducer: ee.Reducer.mean(),
  scale: 25000, // 25km resolution
}).setOptions({
        title: 'Average soil moisture',
        hAxis: {title: 'Date'},
        vAxis: {title: 'Soil moisture [mm]'}});
        
var ETGraph = ui.Chart.image.seriesByRegion({
  imageCollection: ET, 
  regions: Myanmar, 
  band: 'ET',
  reducer: ee.Reducer.mean(),
  scale: 500, // 500m resolution
}).setOptions({
        title: 'Average evapotranspiration',
        hAxis: {title: 'Date'},
        vAxis: {title: 'Evapotranspiration [kg/m^2]'}});

var PRCPGraph = ui.Chart.image.seriesByRegion({
  imageCollection: PRCP, 
  regions: Myanmar, 
  band: 'precipitation',
  reducer: ee.Reducer.mean(),
  scale: 5000, // ~5km resolution
}).setOptions({
        title: 'Average precipitation',
        hAxis: {title: 'Date'},
        vAxis: {title: 'Precipitation [mm/day]'}});

// Display graphs
print(SSMGraph);
print(ETGraph);
print(PRCPGraph);

Which gives us the following output:

Note that “Myanmar” appears in the legend of the graph. If we had not changed the system:index in the beginning, you would instead see something like “000000000000000092“.

Link to the entire script: https://code.earthengine.google.com/e9042e4ac5fc902d1ff58da10856965f

Calculate the percentage (%) cropland for each polygon in a shapefile [Google Earth Engine]

In a previous post, I use a similar script to calculate NDVI per polygon. However, this script includes a small difference which I have not yet myself understood why it was necessary.


As before, my shapefile consists of the administrative borders of Tanzania. I got this shapefile from the GADM database (version 3.6).

// Import administrative borders and select the gadm level 
// (0=country, 1=region, 2=district, 3=ward)
var gadm_level = '2';
var fc_oldID = ee.FeatureCollection('users/username/gadm36_TZA_'+gadm_level);
Map.addLayer(fc, {}, 'gadm TZA');
Map.centerObject(fc, 6);

Now I change the system:index of the FeatureCollection.

Why do this at all? I was struggling to produce a mean value of the COPERNICUS landcover data, after having created a successful script for the MODIS NDVI dataset. When I ran the script, no mean column was created. However, I was able to calculate mean values from a couple of polygons that I created myself within Google Earth Engine, so I knew the problem had to be in the shapefile somehow. So I started to investigate the gadm asset (i.e. the shapefile) and saw that Google Earth Engine automatically assigns some odd index names to each feature (e.g. 000000000001 or 0000000000a). I used the following steps described by the user Kuik on StackExchange to change the system:index:

// Change the system:index ("ID")

var idList = ee.List.sequence(0,fc_oldID.size().subtract(1));

var list = fc_oldID.toList(fc_oldID.size());

var fc = ee.FeatureCollection(idList.map(function(newSysIndex){
  var feat = ee.Feature(list.get(newSysIndex));
  var indexString = ee.Number(newSysIndex).format('%01d');
  return feat.set('system:index', indexString, 'ID', indexString);
}));

print('new system:index', fc);

Now you can see that the system:index has been changed:

Now I load in the landcover data. Here I use the 100m resolution, yearly Copernicus Global Land Cover dataset. Here we can find an image per year from 2015-2019. This dataset has a long list of interesting bands, e.g. a land cover classification with 23 categories, percentage of urban areas and percentage of cropland. In this script, I will look at the percentage of cropland (crops-coverfraction) for different administrative regions in Tanzania. Read more about the COPERNICUS dataset here.

// Load data

var year = '2015'
var lc = ee.Image("COPERNICUS/Landcover/100m/Proba-V-C3/Global/"+year)
      .select('crops-coverfraction')
      .clip(fc)

print('Image from '+year, lc)

print('Projection, crs, and crs_transform:', lc.projection());
print('Scale in meters:', lc.projection().nominalScale());

The last two lines is a good way to get a bit more information about your data if you, like I was, are looking for a reason why your script is misbehaving. It will give you the following output:

Now we can use the reducer reduceRegions. Again, remember that the scale should reflect the spatial resolution of the data. In the image above, we can see that the scale is 100 m.

// Reduce regions
var MeansOfFeatures= lc.reduceRegions({
  reducer: ee.Reducer.mean(),
  collection: fc,
  scale: 100,
})

print('gadm mean', ee.Feature(mean.first())) // Test if mean is produced

// Set visualization parameters    
var lcVis = {
  min: 0.0,
  max: 100.0,
  palette: [
    'ffffff', 'fcd163', '99b718', '66a000', '3e8601', '207401', '056201',
    '004c00', '011301'
  ],
};

Map.addLayer(lc, lcVis, 'crop cover (%) '+year)

// Export the featureCollection (table) as a CSV file
Export.table.toDrive({
  collection: MeansOfFeatures,
  description: 'proba_V_C3_TZA_adm'+gadm_level+'_'+year,
  folder: 'GEE output',
  fileFormat: 'CSV'
});

This should give you the following output:


You can find the full script here.